参考作品:PIVOT

こんにちは。ささめまです。
YouTubeで英語学習とかニュースっぽい動画を見まくっていたらおすすめに「PIVOT」というチャンネルが出てきて、番組が全体的に興味のある分野だったのでWEBサイトを見に行ったらいい感じだったのでご紹介です。
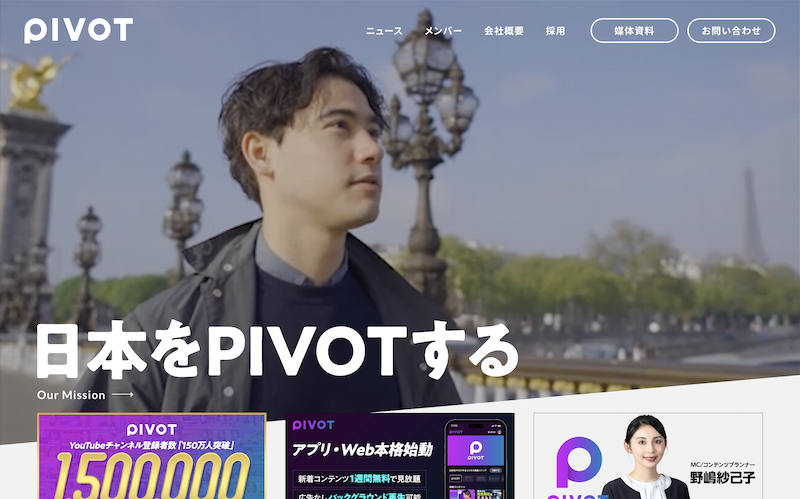
PIVOT株式会社

https://pivot.inc/

グリッド感といいますか、直線とブロックで情報が整理されている感じを出しています。
NHK・Eテレの番組『デザインあ』で放送していた歌『まるとしかく』を思い出しました。歌詞にある「四角はまとまる」「四角は伝える」というデザインの基礎をばっちり抑えた良いデザインだと思いました。

まるとしかく – 嶺川貴子
https://www.uta-net.com/song/140738/

他のページを見てみると結構印象が違うなあと思いましたが、根幹をぶらさずにそれぞれのページの想定閲覧者に最適化する、という考え方なのかなあとも。

PIVOT – MEMBERS

https://pivot.inc/members/

人のエリアをマウスオーバーすると人の明度は変わらないけど背景色は明るくなるというちょっとだけ不思議な感覚を味わいました。
見てみると人の部分は背景透過pngで、背景色のみが変わっているようなのですが、hoverで見てもfocusで見てもどこで変えてるのかわからなかったな…。

あとここの横並び。レガシー環境で育った私には新鮮でした。flexで横並びにしていて4つ並びにする際の記述がこちら。

.box-4 {
    width: calc((100% - 30px* 3) / 4);
}

なるほどこうすれば写真と写真の間を明確に30pxにできるのかふむふむとなりました。
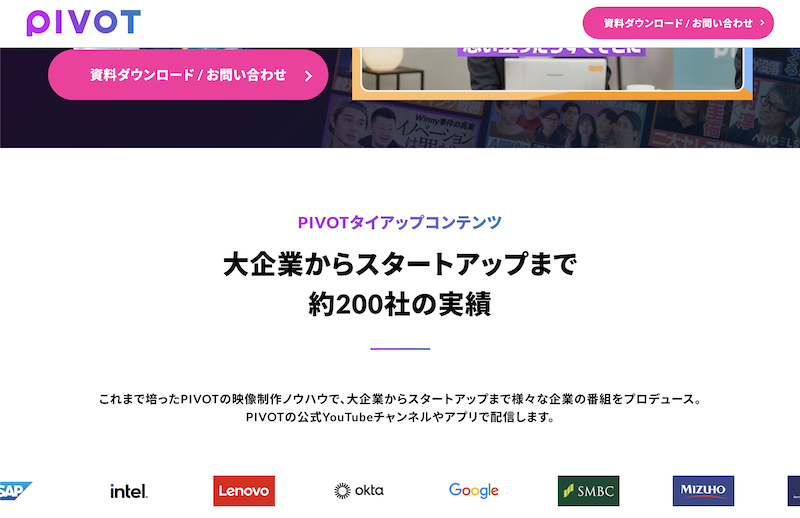
PIVOT – 媒体資料

https://pivot.inc/tieup/

媒体資料ページはめっちゃランディングページ(LP)でした。
ファーストビューはYouTubeの登録者数をアピールしていて、数字は文字の更新のみでできるようになっていたり、要素のpositionを全てvwで指定されていてウィンドウ幅に関わらず同じ見え方になり、(け、計算された美〜〜〜!!好き!!!)となりました。好きです、こういうの。

サブタイトルやバーがグラデーションしていてなうさを感じます。私が過去記事で紹介したAPP BANKのタイトルと同じで、モダン環境企業はこんな感じなのかなとなりました。よかったら過去記事読んでください。(こちらのstyle、最近担当したサイトで使いました!)

参考作品:AppBank2023年上期の記事

こちらのLPを下にスクロールしていくとPIVOTが選ばれる理由というセクションがありまして。
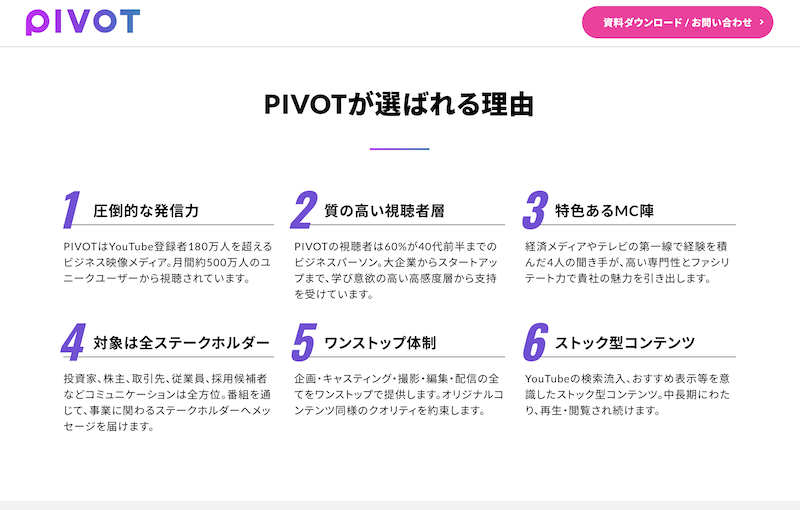
PIVOT – 媒体資料

斜自体数字、かっこええやん?
数字部分のみのCSSは下記のような感じでした。

.lp-reason-heading span {
    position: absolute;
    font-family: 'Oswald';
    font-size: 7.0rem;
    font-weight: 700;
    font-style: oblique;
    color: #764fdb;
    top: -8px;
    left: -10px;
}

Oswaldの数字って、いいんだなぁ。
font-style: obstique;って馴染みのない記述でした。調べたところitalicとほぼ同義のように受け取りました。
「Oswaldを斜字体=かっこいい」の方程式、パクりたい。
(あとclass名にめっちゃlpって書いてありましたね…笑)

mdn web docs_ – font-style

https://developer.mozilla.org/ja/docs/Web/CSS/font-style

Google Fonts – Oswald

https://fonts.google.com/specimen/Oswald

LPのお問い合わせフォームはコンタクトフォーム7でした。シンプルで使いやすいですよね。thanksページの有無が気になるところです。

最後に、採用ページです。
私が憧れていたアウトラインのみの文字が登場!あがる!!
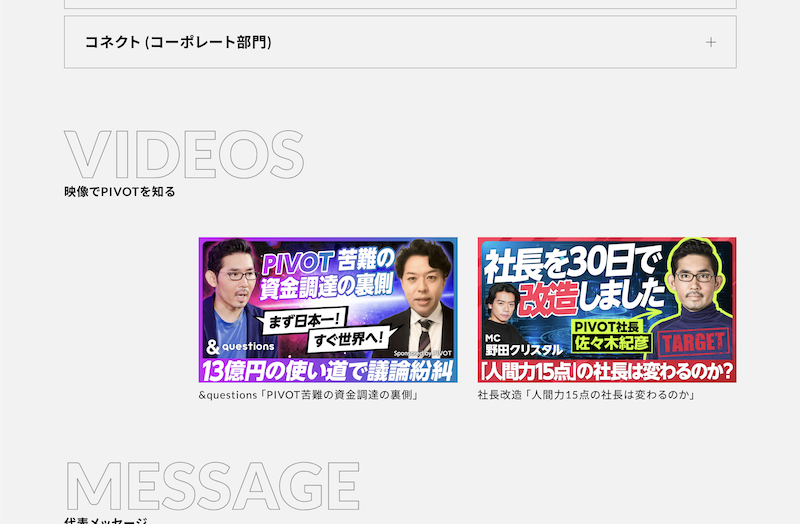
PIVOT – 採用情報

ついに文字のアウトラインのみを取るCSSの秘密が明らかに…!こちらでした。

.recruit-section-title {
    font-size: 8vw;
    font-weight: 900;
    color: #f2f2f2;
    -webkit-text-stroke: 1px #808080;
}

-webkit-text-stroke、そうだったのか…!また一つ学びになりました。
font-sizeをvwで指定しているのが初見で新鮮です。普段remしか使っていなかったのでvwもちょっと試してみたいなぁ。
難癖をつけるようですが、colorはbackgroundと同じ色を使うならtransparentがいいと思いました。

ご紹介と雑感でした!吸い取れるところを吸い取って、弊社のサイトもいい感じにしていきたいです。ではでは。

右にニュッと矢印が出てくるボタン

こんにちは。ささめまです。
仕事に役立つかなと思ってcssや参考作品を集めていたこのブログが実際に仕事で役立って、えも言われぬ達成感を感じています。略してエモい。

今回は矢印がふわっとにゅっと出てくるボタンをご紹介します。

\ コピペでそのまま使えます /

demo

button

code

<a href="" class="button_link">
	<span>
		Hover me
		<svg version="1.1" id="Layer_1" xmlns="http://www.w3.org/2000/svg" xmlns:xlink="http://www.w3.org/1999/xlink" x="0px" y="0px" viewBox="0 0 36.1 25.8" enable-background="new 0 0 36.1 25.8" xml:space="preserve"><g><line fill="none" stroke="#ffffff" stroke-width="3" stroke-miterlimit="10" x1="0" y1="12.9" x2="34" y2="12.9"></line><polyline fill="none" stroke="#ffffff" stroke-width="3" stroke-miterlimit="10" points="22.2,1.1 34,12.9 22.2,24.7   "></polyline></g></svg>
	</span>
</a>
.button_link {
	color: #ffffff;
	background-color: #81d8d0;
	display: inline-block;
	position: relative;
	transition: background-color 300ms ease-out;
}

.button_link span {
  display: inline-block;
  position: relative;
  transition: all 300ms ease-out;
  will-change: transform;
}

.button_link:hover span {
  transform: translate3d(-1rem, 0, 0);
}

.button_link svg {
  position: absolute;
  width: 1.1em;
  right: 0px;
  right: 0rem;
  opacity: 0;
  top: 50%;
  transform: translateY(-50%);
  transition: all 300ms ease-out;
  will-change: right, opacity;
	stroke-width: 5;
	stroke-color: transparent;
}

.button_link:hover svg {
  opacity: 1;
  right: -3rem;
}

design

マウスオーバーすると文字が左にずれて、右側に矢印がしゅっと現れるボタンです。
動きが滑らかで気持ちいいので何度でもマウスオーバーしたくなるデザインだったのでご紹介しました。
svg、軽いし綺麗に描画できるしいいですよね。お友達になりたい。

ではでは

基本のキ(?)右側に”くの字矢印→”がついたボタン

こんにちは。ささめまです。

線との組み合わせボタンがやっぱりなんとなく好きで、
また使いたいので作り方の備忘録です。

\ コピペでそのまま使えます /

demo

button

html

<a href="#" class="button_link">button</a>

css

.button_link {
	width: 280px;
	height: 60px;
	color: #353535;
	text-align: center;
	text-decoration: none;
	font-weight: 600;
	line-height: 60px;
	background-color: #bdefea;
	border-radius: 50vh;
	display: block;
	position: relative;
	transition: 0.3s;
}

.button_link::before {
	content: '';
	width: 40px;
	height: 40px;
	background-color: #fff;
	border-radius: 50vh;
	position: absolute;
	top: 50%;
	right: 10px;
	transform: translateY(-50%);
}

.button_link::after {
	content: '';
	width: 7px;
	height: 7px;
	border-top: 3px solid #353535;
	border-right: 3px solid #353535;
	position: absolute;
	top: 50%;
	right: 27px;
	transform: translateY(-50%) rotate(45deg);
}

.button_link:hover {
	background-color: #81d8d0;
}

design

右端に「 > 」とか「→」がつくボタン、よくあるデザインだけど
正直ちょっとめんどくさいなと思っていたので
こういうシンプルめの記述で再現できるようになったのは
とっっっっってもありがたいです!

::after要素のwidthとheightでくの字矢印の長さを、border-topとborder-rightで太さを変えられます。大きさ自由自在☆

マークアップ言語を覚えたての2014年頃、
ボタンの箱の中に文字+矢印のデザインが大流行。
font-awsomeの矢印達とはマブダチでした。
(font-awsomeの矢印をfloatかpositionで配置するやつ)

それがfont-awsomeから矢印引っ張らなくてよくなって
floatもいらない!positionは使うけど!cssだけで簡単!
便利になって感激です。

もう矢印ボタンは怖くない。
リクエストされてもニコニコで受け付けます^^

ではでは。

遊び心満点!ぽこぽこ系ボタン

こんばんは。ささめまです。

このボタンをより確実に再現する方法を試していたらこんな時間になってしまいました…。
実ったので紹介させてください。

\ コピペでそのまま使えます /

demo

button

html

<div class="button_link">
  <svg xmlns="http://www.w3.org/2000/svg" version="1.1" class="goo">
    <defs>
      <filter id="goo">
        <feGaussianBlur in="SourceGraphic" stdDeviation="10" result="blur"></feGaussianBlur>
        <feColorMatrix in="blur" mode="matrix" values="1 0 0 0 0  0 1 0 0 0  0 0 1 0 0  0 0 0 19 -9" result="goo"></feColorMatrix>
        <feComposite in="SourceGraphic" in2="goo"></feComposite>
      </filter>
    </defs>
  </svg>

  <span class="button--bubble__container">
    <a href="#campaign" class="button button--bubble">
      button
    </a>
    <span class="button--bubble__effect-container">
      <span class="circle top-left"></span>
      <span class="circle top-left"></span>
      <span class="circle top-left"></span>

      <span class="button effect-button"></span>

      <span class="circle bottom-right"></span>
      <span class="circle bottom-right"></span>
      <span class="circle bottom-right"></span>
    </span>
  </span>

  <script src="https://cpwebassets.codepen.io/assets/common/stopExecutionOnTimeout-1b93190375e9ccc259df3a57c1abc0e64599724ae30d7ea4c6877eb615f89387.js"></script>
  <script src="https://cdnjs.cloudflare.com/ajax/libs/gsap/1.17.0/plugins/CSSPlugin.min.js"></script>
  <script src="https://cdnjs.cloudflare.com/ajax/libs/gsap/1.17.0/easing/EasePack.min.js"></script>
  <script src="https://cdnjs.cloudflare.com/ajax/libs/gsap/1.17.0/TweenLite.min.js"></script>
  <script src="//cdnjs.cloudflare.com/ajax/libs/jquery/2.1.3/jquery.min.js"></script>
  <script src="https://cdnjs.cloudflare.com/ajax/libs/gsap/latest/TimelineLite.min.js"></script>

  <script id="rendered-js">
    $('.button--bubble').each(function () {
      var $circlesTopLeft = $(this).parent().find('.circle.top-left');
      var $circlesBottomRight = $(this).parent().find('.circle.bottom-right');

      var tl = new TimelineLite();
      var tl2 = new TimelineLite();

      var btTl = new TimelineLite({ paused: true });

      tl.to($circlesTopLeft, 1.2, { x: -25, y: -25, scaleY: 2, ease: SlowMo.ease.config(0.1, 0.7, false) });
      tl.to($circlesTopLeft.eq(0), 0.1, { scale: 0.2, x: '+=6', y: '-=2' });
      tl.to($circlesTopLeft.eq(1), 0.1, { scaleX: 1, scaleY: 0.8, x: '-=10', y: '-=7' }, '-=0.1');
      tl.to($circlesTopLeft.eq(2), 0.1, { scale: 0.2, x: '-=15', y: '+=6' }, '-=0.1');
      tl.to($circlesTopLeft.eq(0), 1, { scale: 0, x: '-=5', y: '-=15', opacity: 0 });
      tl.to($circlesTopLeft.eq(1), 1, { scaleX: 0.4, scaleY: 0.4, x: '-=10', y: '-=10', opacity: 0 }, '-=1');
      tl.to($circlesTopLeft.eq(2), 1, { scale: 0, x: '-=15', y: '+=5', opacity: 0 }, '-=1');

      var tlBt1 = new TimelineLite();
      var tlBt2 = new TimelineLite();

      tlBt1.set($circlesTopLeft, { x: 0, y: 0, rotation: -45 });
      tlBt1.add(tl);

      tl2.set($circlesBottomRight, { x: 0, y: 0 });
      tl2.to($circlesBottomRight, 1.1, { x: 30, y: 30, ease: SlowMo.ease.config(0.1, 0.7, false) });
      tl2.to($circlesBottomRight.eq(0), 0.1, { scale: 0.2, x: '-=6', y: '+=3' });
      tl2.to($circlesBottomRight.eq(1), 0.1, { scale: 0.8, x: '+=7', y: '+=3' }, '-=0.1');
      tl2.to($circlesBottomRight.eq(2), 0.1, { scale: 0.2, x: '+=15', y: '-=6' }, '-=0.2');
      tl2.to($circlesBottomRight.eq(0), 1, { scale: 0, x: '+=5', y: '+=15', opacity: 0 });
      tl2.to($circlesBottomRight.eq(1), 1, { scale: 0.4, x: '+=7', y: '+=7', opacity: 0 }, '-=1');
      tl2.to($circlesBottomRight.eq(2), 1, { scale: 0, x: '+=15', y: '-=5', opacity: 0 }, '-=1');

      tlBt2.set($circlesBottomRight, { x: 0, y: 0, rotation: 45 });
      tlBt2.add(tl2);

      btTl.add(tlBt1);
      btTl.to($(this).parent().find('.button.effect-button'), 0.8, { scaleY: 1.1 }, 0.1);
      btTl.add(tlBt2, 0.2);
      btTl.to($(this).parent().find('.button.effect-button'), 1.8, { scale: 1, ease: Elastic.easeOut.config(1.2, 0.4) }, 1.2);

      btTl.timeScale(2.6);

      $(this).on('mouseover', function () {
        btTl.restart();
      });
    });
    //# sourceURL=pen.js
  </script>
</div>

css

.button_link {
  text-align: center;
}

.button_link .button {
  background-color: #81d8d0;
  border: none;
  color: #fff;
  display: inline-block;
  font-size: 14px;
  text-decoration: none;
  color: #fff;
  padding: 20px 40px;
  transition: all 0.1s ease-out;
}
.button_link .button:active {
  transform: scale(0.95);
}
.button_link .button--bubble {
  position: relative;
  z-index: 2;
}
.button_link .button--bubble:hover {
  background: none;
}
.button_link .button--bubble:hover + .button--bubble__effect-container .circle,
.button_link .button--bubble:hover + .button--bubble__effect-container .button {
  background: #81d8d0;
}
.button_link .button--bubble:active + .button--bubble__effect-container {
  transform: scale(0.95);
}
.button_link .button--bubble__container {
  position: relative;
  display: inline-block;
}
.button_link .button--bubble__container .effect-button {
  position: absolute;
  width: 50%;
  height: 25%;
  top: 50%;
  left: 25%;
  z-index: 1;
  transform: translateY(-50%);
  transition: 0.1s ease-out;
}

.button_link .button--bubble__effect-container {
  position: absolute;
  display: block;
  width: 200%;
  height: 400%;
  top: -150%;
  left: -50%;
  filter: url("#goo");
  transition: all 0.1s ease-out;
  pointer-events: none;
}
.button_link .button--bubble__effect-container .circle {
  position: absolute;
  width: 25px;
  height: 25px;
  border-radius: 15px;
  transition: 0.1s ease-out;
}
.button_link .button--bubble__effect-container .circle.top-left {
  top: 40%;
  left: 27%;
}
.button_link .button--bubble__effect-container .circle.bottom-right {
  bottom: 40%;
  right: 27%;
}

.button_link .goo {
  position: absolute;
  visibility: hidden;
  width: 1px;
  height: 1px;
}

design

マウスオーバーするとぷにっともちっとお餅がちぎれます。
svgで繋ぎ目をなめらかにしたりと手の込んだボタンです。
本家様ではマウスオーバー中background-colorが変わり続けるのですが、シンプルで使いやすい方がいいかなと思ってbackground-colorは固定にしました。かわいい。

comment

参考サイトを見た時に
え、これかわいすぎる!
と思ってお持ち帰らせていただこうとするも、普通にコピーするだけじゃ全然ぷにっと動かなくて当ブログ環境まで持ってきて実験しておりました。
結構読み込むjsが多くてhtmlに書いてある分はどれか1つ抜けても動かなくなります。もっと簡素にできないかな…とも思うのですがjsど素人で歯が立ちませんでした(;_;)ちゃんと勉強します。

参考にさせていただいたのはこちらです
https://lab.sonicmoov.com/markup/css/hover-css/
>バブルが可愛らしいButton bubble effect

ではでは

AppStoreを感じる影のついたボタン

こんにちは。ささめまです。

線との組み合わせボタンがやっぱりなんとなく好きで、
また使いたいので作り方の備忘録です。

\ コピペでそのまま使えます /

demo

button

html

<a href="#" class="button_link">button</a>

css

.button_link {
	width: 280px;
	height: 40px;
	color: #ffffff;
	text-align: center;
	text-decoration: none;
	background-color: #bdefea;
	box-shadow: 0 0 15px rgba(0 0 0 / .2);
	border-radius: 6px;
	display: block;
	transition: 0.5s;
}

.button_link:hover {
	text-decoration: none;
	background-color: #81d8d0;
	box-shadow: 0 0 10px rgba(0 0 0 / 0);
}

design

AppStoreのトップ画面って記事1つ1つにぼわぁぁ〜っとした影がついていて、ポチッとタップできることがわかりますよね。
確かグッドデザイン賞的な何かを受賞していた気がします。

今回ご紹介したのはボタンですが、記事詳細へのリンクにより似合うと思います。

影のぼわぁぁ〜感を大事にしたかったのでtransitionを0.5sにして余韻をたっぷりめにしました。
どこかでお役に立てば嬉しいです。

ではでは。

マウスオーバーでずれていた枠と重なるボタン

こんにちは。ささめまです。

線との組み合わせボタンがやっぱりなんとなく好きで、
また使いたいので作り方の備忘録です。

\ コピペでそのまま使えます /

demo

button

html

<a href="#" class="button_link">button</a>

css

.button_link {
	width: 280px;
	height: 40px;
	color: #ffffff;
	font-weight: 700;
	text-align: center;
	text-decoration: none;
	background-color: #bdefea;
	display: block;
	transition: 0.3s;
}

.button_link::before {
  content: '';
	width: 100%;
  height: 100%;
  top: -5px;
  left: -5px;
  border: 2px solid #81d8d0;
	position: absolute;
  transition: 0.2s;
}

.button_link:hover::before {
  top: 0;
  left: 0;
}

.button_link:hover {
	color: #ffffff;
  text-decoration: none;
  background-color: #81d8d0;
}

design

ファッション系のサイトで使われているイメージがあります。
幾何学模様とかと相性が良いのではないでしょうか。
その時は:hover時のbackground-colorは変えないとか
線より薄めの色だとかわいい感じに仕上がると思います。

ではでは

菱形(というか平行四辺形)ボタンの作り方

こんにちは。ささめまです。

平行四辺形のボタンってかっこいいですよね…!
作り方のメモ残しておきます。

\ コピペでそのまま使えます /

demo

button

html

<a href="#" class="button_link">
	<span>button</span>
</a>

css

.button_link {
	width: 280px;
	height: 40px;
	color: #81d8d0;
	text-align: center;
	text-decoration: none;
	background: transparent;
	display: block;
	border: solid 2px #81d8d0;
	transition: all 200ms ease-in;
	transform: skew(-10deg);
}
.button_link:hover {
	color: #ffffff;
	background-color: #81d8d0;
}
.button_link span {
	font-weight: 600;
	display: inline-block;
	transform: skew(10deg);
}

design

かっこいーい!
シンプルだけどボタンがちょっとこう凝ってるだけで
このサイトおしゃれだなぁっていう印象になりますよね。
平行四辺形ボタン好きだからいろんなサイトで使われてほしいです!使ってね。

ではでは

マウスオーバーで線をなぞるボタン

こんにちは。ささめまです。

ボタンの枠が塗りつぶされていくcssをご紹介します。

\ コピペでそのまま使えます /

demo

button

html

<a href="#" class="button_link">
	<p>button</p>
	<div class="hover"></div>
	<div class="hover_bottom"></div>
</a>

css

.button_link {
	width: 280px;
	height: 40px;
	text-decoration: none;
	display: block;
	border: solid 2px #eeeeee;
	position: relative;
}
.button_link p {
	margin: 0 auto;
	color: #81d8d0;
	text-align: center;
	position: absolute;
	top: 0;
	left: 0;
	right: 0;
}
.button_link:hover .hover:before,
.button_link:hover .hover:after {
	opacity: 1;
	-webkit-animation: openA 0.4s;
	animation: openA 0.4s;
	animation-fill-mode: forwards;
	animation-timing-function: cubic-bezier(0.39, 0.575, 0.565, 1);
	animation-direction: normal;
}
.button_link:hover .hover_bottom:before,
.button_link:hover .hover_bottom:after {
	opacity: 1;
	-webkit-animation: openB 0.4s;
	animation: openB 0.4s;
	animation-delay: 0.4s;
	animation-fill-mode: forwards;
	animation-timing-function: cubic-bezier(0.39, 0.575, 0.565, 1);
	animation-direction: normal;
}
.hover {
	width: 100%;
	height: 40px;
	position: absolute;
	top: -2px;
}
.hover:before {
	content: "";
	width: 0;
	height: 0;
	border-top: solid 2px #81d8d0;
	border-left: solid 2px #81d8d0;
	display: block;
	opacity: 0;
	position: absolute;
	right: 138px;
}
.hover:after {
	content: "";
	width: 0;
	height: 0;
	border-top: solid 2px #81d8d0;
	border-right: solid 2px #81d8d0;
	display: block;
	opacity: 0;
	position: absolute;
	left: 138px;
}
.hover_bottom {
	width: 100%;
	height: 40px;
	position: absolute;
	bottom: -2px;
}
.hover_bottom:before {
	content: "";
	width: 0;
	height: 40px;
	border-bottom: solid 2px #81d8d0;
	display: block;
	opacity: 0;
	position: absolute;
	right: 0;
}
.hover_bottom:after {
	content: "";
	width: 0;
	height: 40px;
	border-bottom: solid 2px #81d8d0;
	display: block;
	opacity: 0;
	position: absolute;
	left: 0;
}
@keyframes openA {
	0% {
		width: 0;
		height: 0;
	}
	50% {
		width: 140px;
		height: 0;
	}
	100% {
		width: 140px;
		height: 40px;
	}
}
@keyframes openB {
	0% {
		width: 0px;
	}
	100% {
		width: 140px;
	}
}

design

私が紹介するボタンにしてはcssが長いですね笑

シンプルな線のボタンですが、一味違うなと思わせるアニメーションです。
私自身がフロントエンドをやっていることもあってか、工夫してるなーと感心したボタンデザインでした。

※実際サイズとか形変えたりしようとするとpositionの調整が必要で、なかなか大変でした!!
でも完成品はとてもかっこいい…!やる価値はあると思います。

ではでは

マウスオーバーでネオンサインみたいに光るボタン

こんにちは。ささめまです。
生きてます!!死にそうになってたけど!出産しました!わーい

今回はネオンサインのように光るボタンをご紹介します。

\ コピペでそのまま使えます /

demo

button

code

<a href="#" class="button_link">button</button>
.button_link {
	width: 280px;
	height: 40px;
	color: #ffffff;
	font-weight: 600;
	text-align: center;
	text-decoration: none;
	background-color: #81d8d0;
	display: block;
	transition: all 0.3s ease;
}
.button_link:hover {
	text-shadow:
		0 0 10px rgba(255,255,255, 1),
		0 0 50px rgba(255, 255, 255, .8),
		0 0 75px rgba(255, 255, 255, .6),
		0 0 76px rgba(255, 255, 255, .4),
		0 0 77px rgba(255, 255, 255, .5),
		0 0 78px rgba(255, 255, 255, .4),
		0 0 79px rgba(255, 255, 255, .3),
		0 0 80px rgba(255, 255, 255, .2),
		0 0 85px rgba(255, 255, 255, .1);
}

design

シャドウをいじくってネオンが光るようにジワッと光らせます。
黒背景のサイトに絶対とってもよく映える!!!!

タイトルとかにもおすすめなcssなのでぜひ使ってみてください

マウスオーバーで囲み線を描画するボタン

こんにちは。ささめまです。

モードとかシンプルとかオシャレという言葉が似合うサイトに使いたいホバーエフェクトをご紹介します。

\ コピペでそのまま使えます /

demo

button

code

<a href="#" class="button_link">button</a>
.button_link {
	width: 280px;
	color: #81d8d0;
	font-weight: 600;
	text-align: center;
	text-decoration: none;
	border: 2px solid #81d8d0;
	background: transparent;
	display:block;
	position: relative;
	transition:all 0.3s ease-in-out;
}
.button_link:before,
.button_link:after {
	content: '';
	width: 18px;
	height: 18px;
	border-color: #81d8d0;
	box-sizing: border-box;
	border-style :solid;
	display: block;
	position: absolute;
	transition: all 0.3s ease-in-out;
}
.button_link:before {
	top: -6px;
	left: -6px;
	border-width: 2px 0 0 2px;
	z-index: 5;
}
.button_link:after {
	bottom: -6px;
	right: -6px;
	border-width: 0 2px 2px 0;
}
.button_link:hover:before,
.button_link:hover:after {
	width: calc(100% + 12px);
	height: calc(100% + 12px);
	border-color: #81d8d0;
}
.button_link:hover {
	color: #fff;
	background-color: #81d8d0;
	border-color: #81d8d0;
}

design

カギカッコのようにボタンを囲った線を、マウスオーバーでしゅっと伸ばすcssです。
オシャレ感ある。

フォントを変えるとモード感が出るので、遊びのあるサイトで使ってみたいなあと思ってます。